Showing posts with label photography. Show all posts
6.03.2014
the what, when & why | scrapbook edition
When it comes to Scrapbooking, I do a bit of everything. I make traditional layouts, I make minibooks, I maintain a modified monthly version of Project Life, I create photobooks and I use Instagram (which is a form of memorykeeping in my opinion). This is a lot considering I have a job, and a life and other hobbies I enjoy. I don't do any of the aforementioned for posterity...I harbour no hope that anyone will find value in my memories, but me. I do it because I enjoy the process of documenting my own life. Simple. The real question is, with so many options for keeping my memories, how do I determine what to use when...and why?
So here it is:
Layouts are for stories & playing. I don't create a layout if I don't have a deeper story I want to write. The picture is a supporting character. It's also a chance to play around creatively. I cut things up, I sew, I layer and use embellishments...this is when I experiment and try new things.
Minibooks are for subjects with a beginning and an end. Small trips, a single subject (like December Daily). I don't like open-ended minis. I find that they tend to languish in a perpetual state of incompleteness. I like setting parameters and working within them. I like that minibooks can be equally devoted to pictures, stories and play and the smaller scale makes the whole thing infinitely more fun and finish-able:)
Pockets/Project Life are for everyday. So what about that huge part of my life that happens in between the highlights? The meals I eat, the places I go, the tasks I complete, the people that share my life...my outfits, hairstyles, complaints...my every single day? A lot of it goes in pockets every month. I collect all the photos from my random picture taking instruments and I then go about choosing which best represent the month. I write to create context and that's it. Very little decoration just words and pictures...a way for me to remember the small moments and how significant a part they play in the grand scheme.
Photobooks are for pictures. As I find myself getting better at figuring out how to take a decent photo I have longed to have something representative of that, something that I can design myself that is well done and includes really nice images. These take time and a ruthless ability to edit. I am currently making one for my trip to Paris and my niece's graduation.
Instagram is for fun and followers. The biggest difference between Instagram and my physical scrapbooks is that you can follow and be followed. I love following people...I love being inspired, I love getting that peek into peoples lives, I love liking and commenting, I love the enthusiasm people have for sharing. I like the quickness, how I can include a short phrase or a funny descriptor. I like the advertising capabilities...it's like sending a shoutout. It doesn't replace scrapbooking for me...it's more like an extension. I could probably use it more, but because my feed is public I have to be a bit more thoughtful. I notice that there are some people that Instagram everything...do you do that? Use it like a virtual photo album? I'm curious because I don't think of it that way.
So the only remaining question is where do I find the time? How sick are you of that question? The answer is I think people are resourceful and they manage to make time for the things they love. So yeah...it's not like I found time hiding under the couch. I carve out bits here and there. I have arranged my life so I have time for these things. Sometimes that means I don't cook or I don't clean, or I take a lot longer to finish a book...the motto is true...I'd rather be scrapbooking.
5.28.2014
girl, interrupted
image taken somewhere around 25,000 feet
While there are a few caveats which I will get to in a moment, it got me thinking about my own picture taking and the sheer volume of photos I take...especially with my phone. I realized that I too had fallen victim to this memory interruption. Once upon a time I absorbed moments more completely...sure there have always been distractions, but never one I held in my hand. I find that when I put the phone down my senses become far more acute and I am experiencing moments on a more visceral level which effects how clearly I remember them. It seems like I've been trusting my camera phone to do that for me. I didn't think about remembering or even experiencing...I thought about getting the right light, focusing, looking for a place to prop my phone etc. I was blocking my own brain from truly experiencing anything. This very fact was crystallized for me last week at my niece's graduation. It took place at sunset outdoors and at the end there were fireworks. I was trying my level best to get a good picture until my husband whispered to me..."they never look as good in pictures as they do in real life." I quickly put my camera down, but it was too late...they were done.
The research scientist at the university brought up the idea that photographs are less memories and more like retrieval clues. She encourages the idea of "mindful photography" which I think could be something each of us determines individually. Back to those caveats...after reading the study I thought it should have addressed the fact that not all picture taking is meant to preserve a memory...sometimes its purpose is to evoke emotion or simply artistic in nature. I also think familiarity with the process makes a huge difference. For example...when I'm back home in LA and I drive to the beach I am able to experience everything about that drive...the sights, the smells everything, and I think it's directly related to the fact that I know my route so well I could drive it in my sleep. That cannot be said for the times I am dependent upon my GPS. I am focused so heavily on turning right or left in 100 yards or making sure I don't miss my exit that I couldn't tell you a single thing about the drive other than thank God I made it. I think the same can be said for good photographers...they don't need to focus so heavily on their technique which frees them up to experience moments more fully.
For me, practicing "mindful photography" means allowing myself to experience first and record second. If this means missing a few pictures or less than stellar pictures, I'm okay with that. If it means having nothing to Instagram, I'm okay with that too. I also think the very idea of this should spark a conversation about storytelling. A picture is wonderful but without the details, the story...it's just an image. That's why scrapbooking is so valuable to me...it allows me to tell a broader story...a deeper more colorful story complete with words and pictures.
5.23.2014
my favorite | scrapbook inserts
Since switching up my scrapbook style from layouts to pockets I have occasionally needed and wanted to add a bit more. Sometimes that "more" is simply for fun, but more often than not it's for function. Choosing to do a smaller abridged version of Project Life® means less pockets over all...couple that with the fact that I do it once a month and I often find myself with more pictures than space. Sure... I do my best to edit, but really, this is my scrapbook and I want to include what I like, so inserts have become a very necessary part of my process.
Below are my favorite ways to add in more words and pictures:
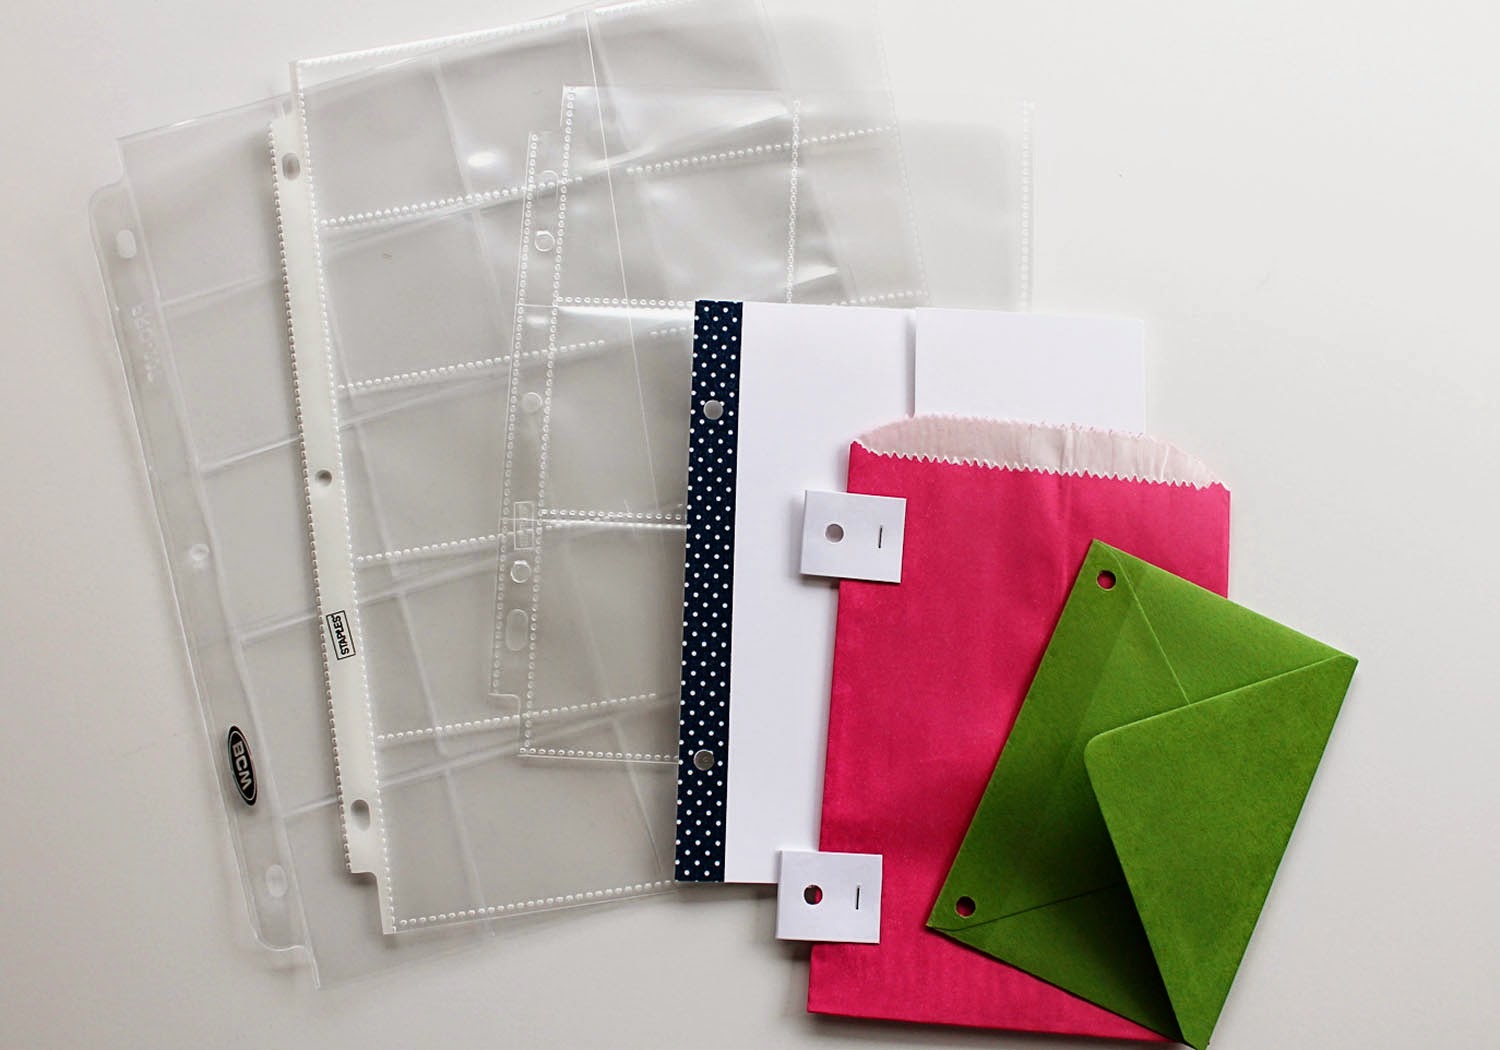
Envelopes: The epitome of "simple is best." If you don't have them you can easily make one using a downloadable template or gently pulling apart a used one and tracing it. I find that envelopes are a good way to add more photos that you don't care to display. It's also great for notes. I keep a monthly notebook and sometimes I don't feel like adding in all the stuff that I've already written down so I just rip the page out of the notebook and pop it in an envelope. Voila! journaling done. *Tip: to reinforce the punched holes use packing tape...I just fold it over the bottom edge and punch.
Small Bags: These are perfect for storing bits of ephemera and such...plus I really like the pop of color they add. Not everything needs to be encased in plastic.
Accordion Folders: I started making these a long time ago when I designed invitations. Some have built in pockets while others just provide a spot to add more pictures. It's also fun to experiment with different folds and such.
Plastic Coin Protectors: Thanks to these brand new protectors by Simple Stories, I don't have to cut down the large 2x2 coin protectors anymore...these fit right in.
Plastic Business Card Protectors: I really love this one because I can use them two different ways. They can easily accommodate vertical Instax style photos or horizontal full size photos. I like doing the little faux instax ones because it leaves me with a bit of space for journaling.
Plastic Coupon Protectors: These are roughly the same size as my normal size protectors and provide six pockets for slightly larger pictures. I don't use this one as much, but I do like having them on hand.
Zipper Pouch: These are the workhorses of my book. My local office supply store typically has all kinds that easily fit (or can be made to fit) my 6x8 binder style album. I use the Martha Stewart ones or the ones sold for day planners. It is a great catch all for business cards, ticket stubs and other bits that I want to hang on to. Simple Stories now offers one made for the Snap album.
6x8 Plastic Protectors: I try to keep plenty of these on hand...partly to accomodate my full size layouts but also so that I have something that can easily be cut apart and stitched up to create an assortment of custom pocket sizes.
I find myself using only one of the above at any given time. I think that for me, adding random inserts keeps the process fresh and I like the ability to create extra space when I need it. If adding inserts are your thing, these flips by Simple Stories or these tabs by Basic Grey might come in handy or even this tab die by Studio Calico...as you may have guessed, I just make my own:)
BTW...if you use the Snap system like I do, Scrapbook.com is having a sale and there are a bunch of brand new protectors:)
Have a Great Memorial Day Weekend!!
5.21.2014
anatomy of a layout | 01
How about a new blog series? I bring you...
Anatomy of a Layout.
I subscribe to the notion that the good stuff lies in the process. Whether it's knitting, cooking, or memorykeeping...I'm always so interested in the inbetween. In this series I will be sharing layouts in various stages of completeness. Some days it will be a solitary image, like today, where I simply breakdown the process via diagram. Other times it might be a before and after pictorial depicting the plan I had at the beginning and how it evolved in the end. I will also do an image heavy step by step. Lastly, while I am hardly an accomplished video maker...I do think it could be nice to see the process in real time as well.
While I know that there is nothing novel about the scrapbook layout process...I do hope you find some value in it. I intend to focus on a few particular areas, namely...Inspiration, Trends/Techniques, Design + Color choices and Journaling. I will also mention supplies, but briefly since I don't use very many.
Layout 01 | Up Close and Personal
When seeking inspiration I rarely look to other scrapbookers. Most of what I make comes from either a print ad/magazine layout that I've pinned or collected, a recycled idea from a previously completed layout or a sketch. Some sketches are my own, but most are not. I get them a variety of places but I'm currently taking a workshop over at Studio Calico and I like it a lot.
Here's the details. Click on the picture for a larger view.
Aside from cutting thin rectangles into paper, this layout came together rather quickly. Because I am a painfully slow scrapbooker, I engage in a good deal of planning on the front end. I hardly ever begin a page without some notion of where I'm going with it. One of the things I didn't mention was the journaling. I like there to be words on every page I make....sometimes I keep things very brief, but there is always a story. Perhaps if I was a better photographer then my pictures would be enough, but I'm not and they aren't. So, that's it...until next time.
Anatomy of a Layout.
I subscribe to the notion that the good stuff lies in the process. Whether it's knitting, cooking, or memorykeeping...I'm always so interested in the inbetween. In this series I will be sharing layouts in various stages of completeness. Some days it will be a solitary image, like today, where I simply breakdown the process via diagram. Other times it might be a before and after pictorial depicting the plan I had at the beginning and how it evolved in the end. I will also do an image heavy step by step. Lastly, while I am hardly an accomplished video maker...I do think it could be nice to see the process in real time as well.
While I know that there is nothing novel about the scrapbook layout process...I do hope you find some value in it. I intend to focus on a few particular areas, namely...Inspiration, Trends/Techniques, Design + Color choices and Journaling. I will also mention supplies, but briefly since I don't use very many.
Layout 01 | Up Close and Personal
When seeking inspiration I rarely look to other scrapbookers. Most of what I make comes from either a print ad/magazine layout that I've pinned or collected, a recycled idea from a previously completed layout or a sketch. Some sketches are my own, but most are not. I get them a variety of places but I'm currently taking a workshop over at Studio Calico and I like it a lot.
Here's the details. Click on the picture for a larger view.
Aside from cutting thin rectangles into paper, this layout came together rather quickly. Because I am a painfully slow scrapbooker, I engage in a good deal of planning on the front end. I hardly ever begin a page without some notion of where I'm going with it. One of the things I didn't mention was the journaling. I like there to be words on every page I make....sometimes I keep things very brief, but there is always a story. Perhaps if I was a better photographer then my pictures would be enough, but I'm not and they aren't. So, that's it...until next time.
5.14.2014
pocket memorykeeping | april
My April spread came together pretty quickly even though I had a lot of pictures. On average, I find I'm using two 3x4 protectors and one 2up 4x6 protector. Occasionally I add an insert. This month I used a business card page protector that I altered to accommodate four pictures on each side. I don't own an Instax, I just imitate the look.
As for using the SC Kit, I have to say, this month was far easier than last and I know that had a lot to do with the colors. I wasn't fond of the March journal cards...but loved April. Everything just worked so much better. Initially I was going to use the full cards and ignore the rounded corners as so many people suggest...but I couldn't do it. I just don't like rounded corners so I had to change things up a bit. I'm still only using a rather small percentage of the kit. Out of 24 cards I used 5 and a few of the die-cut labels. This seems like hardly enough to warrant the cost, but it's hard to say at this point if the other supplies won't find themselves useful in future projects.
who knows...the bottom line?
April is done:)
5.09.2014
day in the life | 2014
Yesterday I participated in Ali's Day in the Life project. I've done it before, but never really accomplished much with the photos. Every year I find the constant picture taking fun at first and then annoying. I didn't want to think about setting up the camera to photograph a long ass conference call or what happens to Ronin/Cujo when the mailman comes. These are all part of my days but somewhat impossible to capture on camera.
I was happy that this years DITL landed on a pretty calm day for me. There wasn't a ton on my to-do list and it was pretty typical over all. I opted to only photograph what I would normally photograph for my monthly pocket album and didn't worry about every last detail. I did take care to write everything down though. I still wanted to record my day, I just didn't want to do it primarily through pictures. I ended up printing out a single picture for my album and writing everything out directly on it. I took one silly pic in the morning...I meant to use it to Instagram my daily bun, but ended up using all that white space for recording my day. I am quite pleased with the result and glad I took the time to write things down as they happened. This is what most of my days look like...
messy bun included.
I was happy that this years DITL landed on a pretty calm day for me. There wasn't a ton on my to-do list and it was pretty typical over all. I opted to only photograph what I would normally photograph for my monthly pocket album and didn't worry about every last detail. I did take care to write everything down though. I still wanted to record my day, I just didn't want to do it primarily through pictures. I ended up printing out a single picture for my album and writing everything out directly on it. I took one silly pic in the morning...I meant to use it to Instagram my daily bun, but ended up using all that white space for recording my day. I am quite pleased with the result and glad I took the time to write things down as they happened. This is what most of my days look like...
messy bun included.
5.03.2014
a walk down memorykeeping lane
Happy National Scrapbooking Day! Yes, it's a thing.
I thought that it would be fun to share some of my early scrapbook layouts and kinda see how much...or how little I've evolved:)
This may very well have been my 2nd or 3rd layout ever. 8.5x11 because that was my jam and still is sometimes and lots of distress inking and stamping. I made those flowers free hand so yeah, the making of my own embellishments started from the very beginning. Just to give you a frame of reference, my niece was about two in that picture and she just turned 18 four days ago. EEK!
Another Allie layout because early on I thought scrapbooking was all about kids and since I didn't have any I used the one and only child to whom I had somewhat unlimited access. 2005 and I was super into layering and patterns. Oh, and tearing paper...i don't know what I was thinking other than
TRY EVERYTHING!!!!
Still on the "scrap my sister's kid" train. I decided to try 12x12 and it felt like a lot of real estate to fill up. I also realized that I'm a one maybe two photos kinda gal and always have been. More layering, more handmade embellishments. I still love this picture and remember that day fondly.
Yup, I was way more prolific in my early scrapbooking years. This was pretty simple and I think it was a scraplift...so if it looks like something you made back in the day, thanks for the inspo:) To those that think using embroidery floss on scrapbook pages is new, it's not. I'm glad that it made its way back around again but I'm no longer really into it.
Yay! Seven years later my sister gives birth to another child just so I'd have someone other than Allie to scrapbook. Okay...that might not have been the whole reason. Clearly my style evolved very little. One picture, layers, buttons and handwritten journaling along the side. I have about 50 more that look just like this one.
A rare two picture layout, but it follows my basic formula. It was around this time that I started machine stitching on everything. My nephew was about two or three in this picture and he is now 11. Love that I was still using buttons and cut out embellishments.
Around 2006 I stopped scrapbooking my niece and nephew. I wanted to scrapbook my family as an extension of my own life and not as the primary subject matter. I also cancelled all of my scrapbooking magazine subscriptions since they never really got behind depicting layouts that looked like my life. I switched to the Internet where I discovered the Dares and other styles of scrapbooking that more closely fit my aesthetic.
Cut to 2010 and I was still keeping pictures to a minimum...still layering and still machine stitching. The big addition was mist. Let me tell you...it was short lived. I still like mist, but I don't do it very much.
Almost 20 years later and I'm still participating in this amazing hobby. It has helped my unwind, it has helped me become far more observant, it has helped me remember things I had long forgotten...but really it's made me happy and grateful for my life. I think all these layouts pretty much look alike...except for that first one which was kind of an anomaly. I still like all of the same things. My favorite embellishments are still the ones I make myself. I still use some of the exact same paper punches and supplies. I now scrapbook 6x8 layouts which is really a slightly smaller version of 8.5x11 and these days it's almost all about me:)
Here's to another 20 years. Oh...and note to self...use my own handwriting more.
I thought that it would be fun to share some of my early scrapbook layouts and kinda see how much...or how little I've evolved:)
This may very well have been my 2nd or 3rd layout ever. 8.5x11 because that was my jam and still is sometimes and lots of distress inking and stamping. I made those flowers free hand so yeah, the making of my own embellishments started from the very beginning. Just to give you a frame of reference, my niece was about two in that picture and she just turned 18 four days ago. EEK!
TRY EVERYTHING!!!!
Still on the "scrap my sister's kid" train. I decided to try 12x12 and it felt like a lot of real estate to fill up. I also realized that I'm a one maybe two photos kinda gal and always have been. More layering, more handmade embellishments. I still love this picture and remember that day fondly.
Yup, I was way more prolific in my early scrapbooking years. This was pretty simple and I think it was a scraplift...so if it looks like something you made back in the day, thanks for the inspo:) To those that think using embroidery floss on scrapbook pages is new, it's not. I'm glad that it made its way back around again but I'm no longer really into it.
A rare two picture layout, but it follows my basic formula. It was around this time that I started machine stitching on everything. My nephew was about two or three in this picture and he is now 11. Love that I was still using buttons and cut out embellishments.
Around 2006 I stopped scrapbooking my niece and nephew. I wanted to scrapbook my family as an extension of my own life and not as the primary subject matter. I also cancelled all of my scrapbooking magazine subscriptions since they never really got behind depicting layouts that looked like my life. I switched to the Internet where I discovered the Dares and other styles of scrapbooking that more closely fit my aesthetic.
Cut to 2010 and I was still keeping pictures to a minimum...still layering and still machine stitching. The big addition was mist. Let me tell you...it was short lived. I still like mist, but I don't do it very much.
Almost 20 years later and I'm still participating in this amazing hobby. It has helped my unwind, it has helped me become far more observant, it has helped me remember things I had long forgotten...but really it's made me happy and grateful for my life. I think all these layouts pretty much look alike...except for that first one which was kind of an anomaly. I still like all of the same things. My favorite embellishments are still the ones I make myself. I still use some of the exact same paper punches and supplies. I now scrapbook 6x8 layouts which is really a slightly smaller version of 8.5x11 and these days it's almost all about me:)
Here's to another 20 years. Oh...and note to self...use my own handwriting more.
5.02.2014
pocket memorykeeping | march
So I already discussed some of the challenges I faced this month with my pockets. I got a kit and had a bit of difficulty incorporating the bits into my somewhat formulaic process. I kinda think there were parts were I forced it...I'll just show you.
Like usual, I used three protectors for the month. Two 3x4's and one full size 6x8. I had lots of photos this month so I included some flip up cards as well as an accordion card. Speaking of flip cards I've been makeshifting them for a long while now, but apparently Simple Stories makes a single 3x4 or 4x6 protector that has adhesive on the top and can be used to create your own flip card. Thanks, Ali. I didn't have any so I just did what I always do...cut a bit of printer paper...sandwich between two cards and fold at the seam...voila! They're totally low budge and the top card is not in plastic, but they work for me.
I really love using a photo for the month...just putting a filler card in there feels wasteful so this month I used a circle, adjusted the opacity and wrote "March" on the inside. Done. This is also my first flip card. I made the little tabs that say "lift." That tiny heart stamp is from the kit.
The "nature" stamp was part of the Gertrude add-on. It felt just a tiny bit forced...I certainly didn't need it...but it worked and I had it so there it goes. I was surprised how much I liked the cork alphas since I don't really like cork, but that's what kits are for...to introduce you to things you thought you'd never use. On the right side I used a full size photo since I was going to document my day trip on the back.
The left side documents my trip to Bainbridge Island. I could have easily created a simple collage, but I liked the idea of designing mini polaroid-esque pictures and adhering it to a sheet of kraft cardstock. On the left, the sticker and that striped card and stamp are from the main kit. The arrow stamp and "this & that" card is from the add-on.
I made another flip card on this side using the Gertrude Add-on again. I think I was really drawn to that kit because I found it to be much more simple and clean. I also loved that the cards weren't rounded. I'm not a fan of the rounding, but I'm trying to get over it.
I also got bit fancy and made an accordion card. I made it the same way I make my flips...just times four. I find if I stack more than four it's just too thick. When I fold it up it's not much thicker than a piece of flair. It's a fun way to add more pics and I love little surprises like this.
March is officially in the can and I'm ready to get started on April.
Like usual, I used three protectors for the month. Two 3x4's and one full size 6x8. I had lots of photos this month so I included some flip up cards as well as an accordion card. Speaking of flip cards I've been makeshifting them for a long while now, but apparently Simple Stories makes a single 3x4 or 4x6 protector that has adhesive on the top and can be used to create your own flip card. Thanks, Ali. I didn't have any so I just did what I always do...cut a bit of printer paper...sandwich between two cards and fold at the seam...voila! They're totally low budge and the top card is not in plastic, but they work for me.
I really love using a photo for the month...just putting a filler card in there feels wasteful so this month I used a circle, adjusted the opacity and wrote "March" on the inside. Done. This is also my first flip card. I made the little tabs that say "lift." That tiny heart stamp is from the kit.
The "nature" stamp was part of the Gertrude add-on. It felt just a tiny bit forced...I certainly didn't need it...but it worked and I had it so there it goes. I was surprised how much I liked the cork alphas since I don't really like cork, but that's what kits are for...to introduce you to things you thought you'd never use. On the right side I used a full size photo since I was going to document my day trip on the back.
The left side documents my trip to Bainbridge Island. I could have easily created a simple collage, but I liked the idea of designing mini polaroid-esque pictures and adhering it to a sheet of kraft cardstock. On the left, the sticker and that striped card and stamp are from the main kit. The arrow stamp and "this & that" card is from the add-on.
I made another flip card on this side using the Gertrude Add-on again. I think I was really drawn to that kit because I found it to be much more simple and clean. I also loved that the cards weren't rounded. I'm not a fan of the rounding, but I'm trying to get over it.
I also got bit fancy and made an accordion card. I made it the same way I make my flips...just times four. I find if I stack more than four it's just too thick. When I fold it up it's not much thicker than a piece of flair. It's a fun way to add more pics and I love little surprises like this.
March is officially in the can and I'm ready to get started on April.
4.18.2014
MAKE IT | DIY POSTCARDS
As we slowly approach the season of road trips and vacations I find myself sifting through my collection of postcards. I don't keep very much mail, but for some reason I always hang on to them...attaching them to my fridge or my bulletin board. Quite honestly, I almost prefer a postcard to a greeting card...I don't know why, maybe I just love imagining myself in the picture...just slightly out of frame or the idea of someone stumbling on my pack of old postcards one day. Yes, I'm a bit of a romantic and to me...postcards can be pretty wonderful.
I decided to make of few...just a pack of pretty pictures that I could give as a gift or keep for myself. The box is all important because it inspires the recipient to perhaps start a collection of their own.
Here's how I did it:
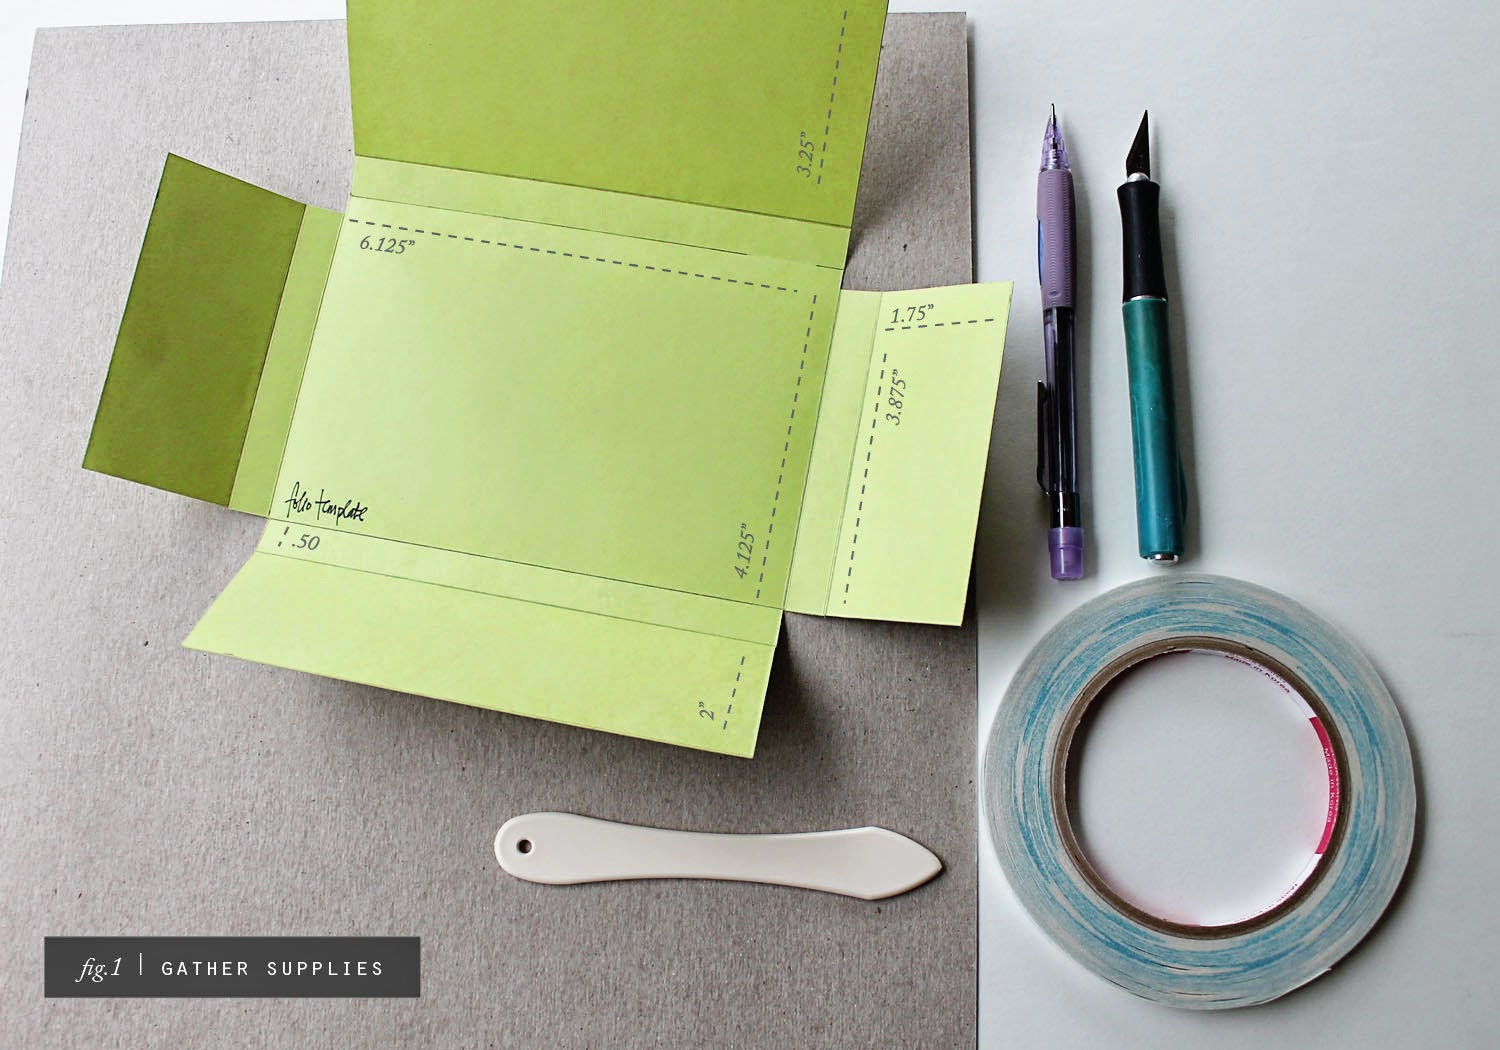
fig.1 I gathered my supplies for the box first. This included a 12x12 piece of chipboard that came in a shipment I received. A template I made, some strong adhesive, a pencil, a craft knife with a fresh blade and a bone folder.
fig.2 Trace the template on the chipboard, cut and score. Use the picture and measurements as a guide. Round corners if you like and add tape. The box is designed to accommodate standard 4x6 cards.
fig.3 Choose the pictures you'd like to use. Include a good assortment that will work well for a variety of occasions. Don't be afraid to try fun filters...they work well for this kind of project. I prefer Kodak photo paper with the satin finish. Add double sided adhesive to the reverse side of the photograph.
fig.4 Adhere photos to the postcard backing that you can download here. Trim the edges if they don't match up exactly. This process is called duplexing. I use a crisp white card stock for the postcard side.
fig.5 Use a piece of black cord or elastic to keep your box closed. You can also use a small Velcro dot. If you're giving as a gift, be sure to include a set of postcard postage and even a cute pen. Enjoy!
4.11.2014
pocket memorykeeping | my process I

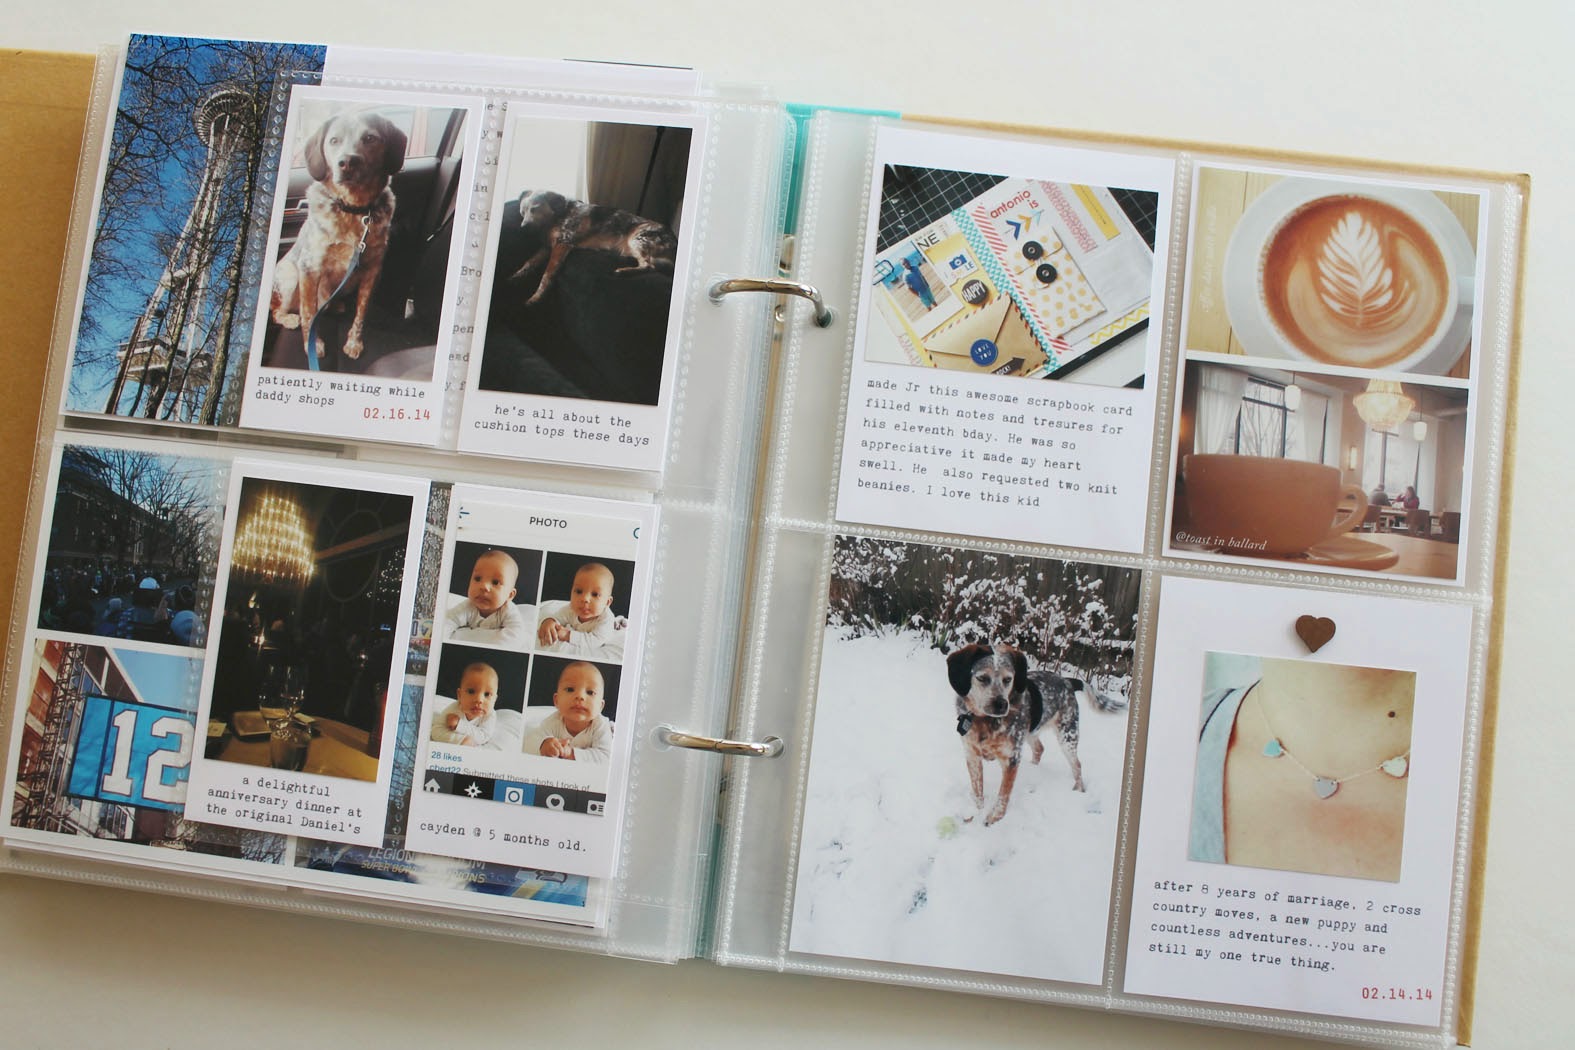
edited to add: a few people asked about the page protector to the left in the above photo. It is actually made for business cards and I got it at Staples. I just cut it down from 8.5x11 so it would fit in my book. I turn it to the side and punch holes. The top two pockets are open on the bottom...it may seem like the photo would slip out but that never happens since the cards on the other side keep things pretty snug. I modified my pictures so they would look like Instax photos...but they're not:)
Because I update my album monthly, I am always working a month behind. I love it...for me it means that I can relax, take pictures, and just let life happen. I use a small notebook to jot down highlights...it's not a journal or a date book, it's just for things I might forget. I don't even concern myself with the current month until it's over. Once the new month begins I begin my process... usually within the first week.
Step 1. I transfer photos from my devices to my computer. I save to an external hard drive at the same time. Sometimes this is all I do on a given day. It helps to break things up a bit.
Step 2. Using Aperture, I clear out the pictures I don't want and I place the ones I do want into an album titled "month_year." I occasionally edit my photos in Aperture using VSCO, but this is rare. I simply prefer and am more proficient in Photoshop. I create a new folder and export the images I want to use into that folder. I then edit using Rad Lab. I always edit a bit...it makes up for my less than stellar photography talents. I stash any ephemera I have in a MS zipper pouch.
Step 3. I draw up a little sketch of where I want things to go and then crop accordingly. Because my style is so basic, I use a handful of different designs over and over. At this point I work on adding journaling...some directly to photographs...some on journal cards in Illustrator. I know that there are people who add journaling the way I do using apps on their phone and just printing the whole thing out, but I don't.
Step 4. I print my pictures separately and then adhere them to plain white cards that I've already printed and cut. It might seem a bit inefficient to print them separately, but it's my process and it works and it allows me to utilize every inch of photopaper for pictures.
Step 5. Once I have all my photocards completed, I look them over and see if anything needs to be added. Usually I keep things basic...occasionally I'll add a label, a bit of flair or some wood veneer or washi...but more often I just slip them into the page protector and call it done.
That's it. 90% of the work takes place even before the pictures are printed out. From start to finish it takes me no more than a few days. I know this isn't the most creative process...I don't use that much stuff, but that's not what it is for me right now. I get creative with other parts of this book...but I'll leave that for part two.
.......................................................................................................................................................................
The winner of the giveaway was Rhonda Nichol.
- rhonda nickol said...
- Right now my go to essentials are my stamps, mist/spray
paint, wood veneer,labels/tags esp. Bananfish(my favorite),tiny attacher
and i recently found a liking for doilies and enamel dots. I love
adding some of these items to projects, I like alot of detailing to
projects. Gotta start using my stash!April 8, 2014 at 9:22 PMsend me your mailing address and I'll get your album out pronto. france@bananafishstudio.com
Subscribe to:
Posts (Atom)